Monday, December 14, 2015

Soda pops with Gertie!!


I had the opportunity to work with Linda Lehn from Merry Church Mouse again as a tester for her new Gertie dress pattern, and I can honestly tell you that I love this pattern!  It’s a vintage style dress that was inspired by a movie that Linda saw, and I was over the moon in love when I saw the initial drawings for this dress!

My daughter is six and has migrated away from ruffles to a simpler style when she chooses the dresses she wants, and when she said, “Hey, momb, can I get two or three of this dress?” I was secretly jumping up and down inside.  My husband wasn't so excited to hear that she was not interested in anything  on my shelves so we would be going to the fabric store to get more fabric.  I wasn't so secretly excited about that prospect!!

The pattern is rated intermediate, and I really do recommend that you have some sewing experience to tackle this dress.  It has a few elements that aren’t hard to do, but it really does help if you’ve sewn a few things before taking this dress on. 

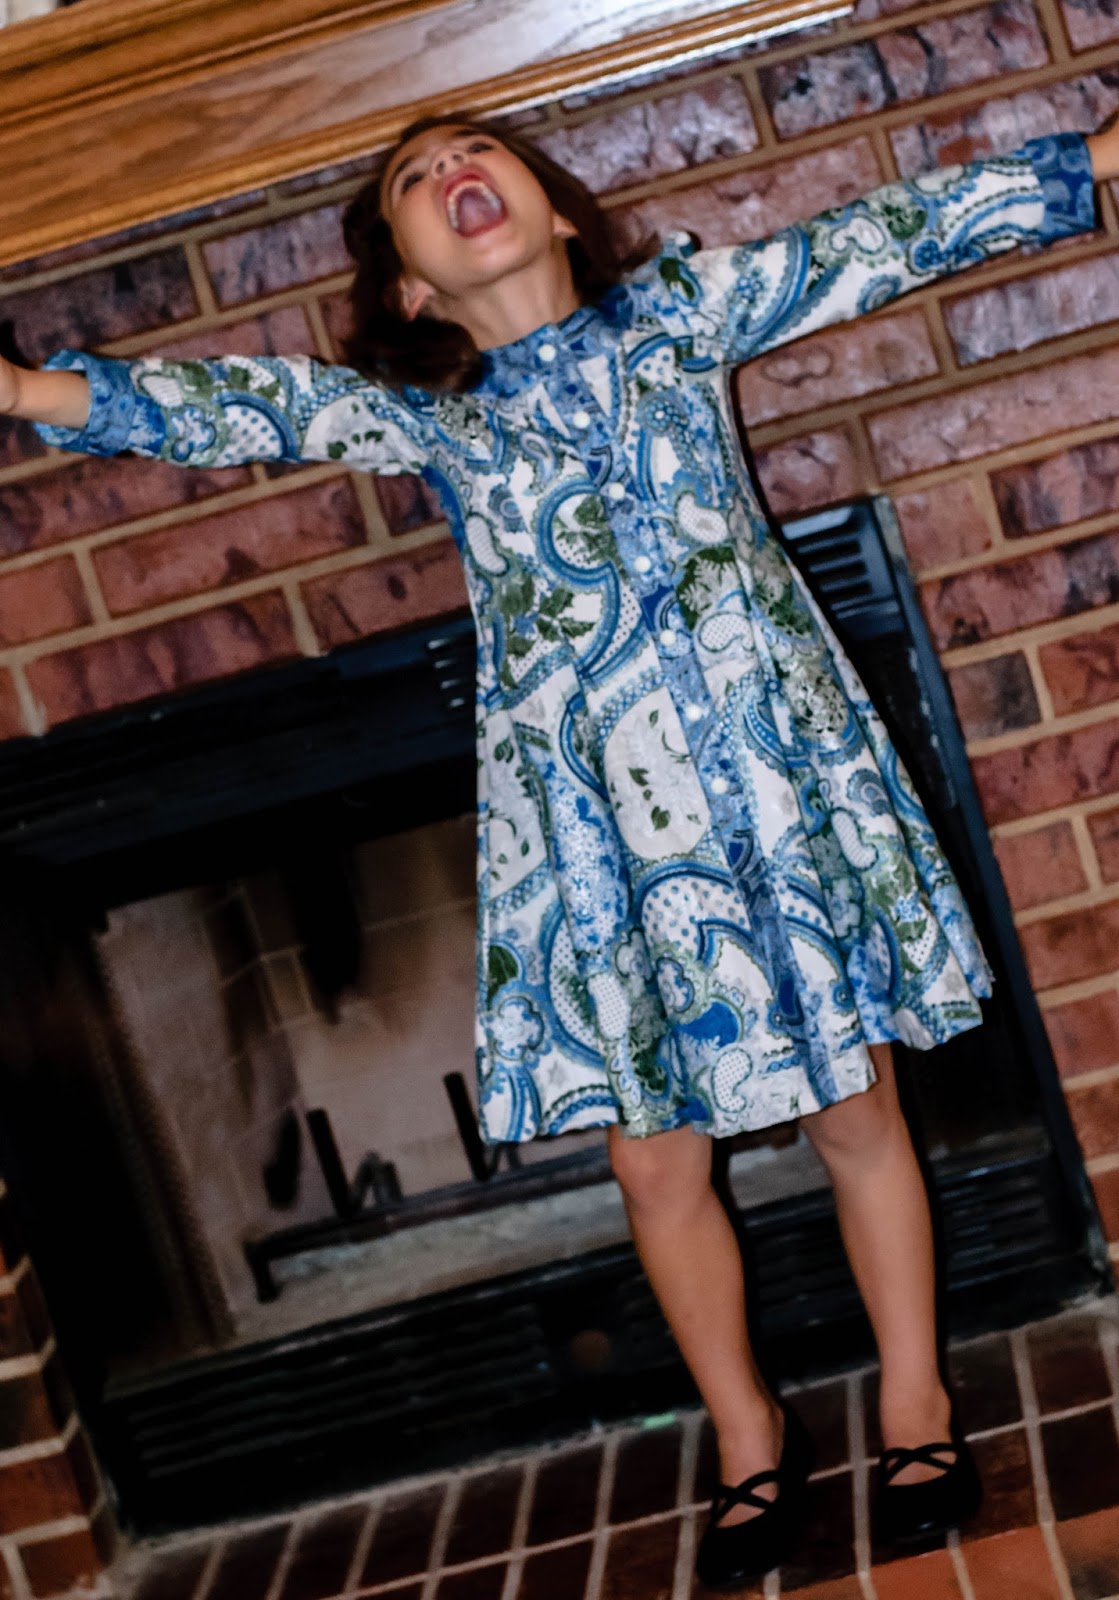
The dress features a long sleeve with a short sleeve option, a gathered skirt in the back, and princess seams that give the dress a tailored, more polished look.  There are also little cuffs on the sleeves that can either be rounded or scalloped. It has a madeira applique collar (also in either a rounded shape or scalloped), and I was a little nervous at first since I have never actually tried this style applique before.  However, after I got my sew-jo going, it was so easy to do with the instructions that Linda provides. 

For the collar, Linda suggested that we use water soluble thread.  For the first two dresses that I made, I used regular thread, and it was definitely do-able.  However, if you can order some of the water soluble thread, it made my life so much easier when I did the third dress! 
The pattern tiles do call for a fair bit of paper, but don’t let that discourage you at all when you start piecing it all together.  I actually used a glue stick to put the sheets together, and it came together very quickly.  The end product is so amazingly precious that it was worth the time it took to glue the pattern pieces. 

I love that this pattern ranges from size 2T to 10.  My daughter is already in a size 6, and I’m quickly realizing that a lot of the patterns I have for her are going to start going by the wayside in a couple of years, so I was very excited to see that this one will grow with her for a few years to come…and  with both long sleeve and short sleeve options, I can make her dresses that will work for both cold and warm weather!  My daughter’s favorite parts were the twirl factor and the little tab at the back that looks like it buttons to keep the dress gathered.  She’s already looking at fabric options for at least two more dresses!  With a little girl who’s tastes are as fickle as the winter weather here in Oklahoma, I’d definitely say that’s a win. 

If you want a dress that’s simple and classic yet has limitless options for embellishment, this dress is perfect!  Linda is also going to have this pattern available at a special release price, and you can snag it for 50% off at her shop or on Craftsy.  At $5, this is a really great deal, but that price is only available until Friday, 18 December so don’t miss out!  You can go to either of these links to get your copy:


Thanks so much for reading along, and Happy Sewing!
Blessings,
Kim


Friday, November 20, 2015

Hanging with Penelope


I hate clothes shopping.  I will put it off as long as possible just so I don't have to deal with the disappointment of a store full of clothes that don't fit for this reason or that.  So, when Marisa put out the call for testers for her Penelope Pleated Camisole, I jumped at the chance.  I was so excited when she told me that I had been selected as a tester.

This cami does take just a tiny extra bit of time to put together with all of the pleats, but the end look is worth it.  There is an elastic casing at the waist that gives the top a little bit more shape and it's just long enough that it covers my behind.  I always get pretty excited when I find a top that will cover my rear.  You'll also have some elastic at the neckline to help pull in the top part a little as well.  I wore this to chase my 5 year old kids around the house, and a few days later, I wore it on an airplane when flying to my parents' house.  The top is roomy enough that I had no trouble moving around at all, and it was super comfortable.  On my top, the waist elastic was a little longer than in the pattern, and I really do think that I will go back and shorten the elastic to make it a little tighter around the waist.


I made myself a casual top for the test, but I already have visions of making another one that's a little fancier that I can wear with a skirt or pair of slacks.  The style of this top makes it really easy to dress it up with a simple jacket or cardigan, and it's loose enough that I can layer it with another shirt as the weather gets cooler!  

The fabric is a woven that has some drape to it, and I would definitely recommend this for someone who has some sewing experience or a beginner who's wanting to challenge themselves a little!
Photo courtesy of Laela Jeyne Patterns

If you're seeing this top and loving it like I do, it just so happens that you can grab your copy on sale $5.50 until 30 November!  No coupon code needed for this one.

Just head over to http://www.laelajeynepatterns.com/product/penelope-pleated-camisole-pdf-pattern/ to get your copy.  Marisa also has a facebook group that you can join so you can follow what's up with Laela Jeyne and ask any questions you might have along the way!

Thanks for reading along and Happy Sewing!

Sunday, July 12, 2015

Thrifty and quick pattern weights

I don’t know how many of you do a lot of sewing, but for me, sewing is my happy place.  When I’m stressed, I sew.  When I want to pretend that I don’t have dinner to cook and laundry to fold, I sew.  When I’m cranky, I sew…it’s just where I go to gather myself together and get lost in something for a bit. 

Now, that being said, it’s also my "fuss at the machine and curse at the patterns" place.  My husband usually stares at me blankly when I start yelling at pieces of paper or begging the machine to please just finish before the bobbin runs out....but it makes me feel better so I just keep right on talking to my inanimate sewing items.

Well, my latest fight has been with the patterns.  With the humidity here in Oklahoma, my paper sometimes doesn’t want to cooperate and will curl up at the edges OR I get to the end of tracing only to realize that, the pattern piece MOVED!!!  It’s sheer awesome when that happens.  So, today, I finally gave up the ghost and decided that I’m making pattern weights.  Weights are really so easy to make that I have ZERO reason for being lazy anymore.  Except that I’m being lazy…

So here goes!  I used scraps because I have gobs and gobs of scraps that I “might need someday so I’ll keep it”.  I know a lot of people use washers that you can get from the hardware store, but I’m trying to be thrifty here so I used some glass rocks that have been sitting in my office for ages; relics of a long abandoned project.

I decided to make four of these little weights to start with.  I wanted them to be about 4”x4” so I cut eight 5” x 5” squares (2 per weight, ).  I used a ½” seam allowance on each side because I was too lazy to do the math for any other measurement.  I decided to make all the squares a different print just because I have so many scraps to pick from.

Next, I sewed up 3 sides of the squares (right sides together) to make a pocket for each of the weights. I trimmed down the corners and the sides to reduce the bulk.
After I turned it right side out, I topstitched the three sewn sides.  Ignore that I went all the way to the edge on that.  I should have stopped at 1/2" from the top on the open edges. 

Topstitching all the way to the top...yup, I got carried away!
I plunked about 4 or 5 stones into each pouch.  I think if I make more of these I might use beans or something to fill the bags to see if that makes a difference in how they work.
I folded the open edge inward 1/2" and sewed the top shut...and voila!  Pattern weights that took me about 40 minutes to make and used stuff I have already!

I know it seems small but this was a big deal for me to actually get some pattern weights made.  I've scrapped a couple of projects because the pattern moved while I was tracing and completely threw off the pieces!  There are a ton of tutorials out there on how to do something like this, but I figured I would share how I did it.  I might even try making some other shapes next time!

Thanks for stopping by and Blessings!!
Kim

Friday, May 8, 2015

I'll love you forever...


Mother’s Day is going to be upon us this Sunday.  Every year since Naomi was born, my mom has called to tell me she is thinking of me and wishing me a Happy Mother’s Day.  This year, however, that call isn’t going to come.  I will not be hearing my mother’s voice with the familiar, “Hey, girl” that she always opens our conversations with.  My mom is still fighting to get her voice back.  I have purposefully not shared what happened in August 2014 that just devastated my heart to its core and continues to break me nine months later.

I had just walked in the door from an afternoon out with the kids, and Josh was home…middle of the day...standing in the living room waiting for me.  He stared at me, and I knew.  The next words he said just took my breath right out of me.
“Your mom has had a stroke.  It’s bad.”

She had called me two or three days before this happened. The morning of, I had told the two littles that we were going to call her.  Now, I couldn’t.  I didn’t even know if she was going to live through the night.  Would she be in a vegetative state?  Would she ever walk again? Would she ever talk again?  WHY DIDN’T I CALL HER BACK???  That last question has haunted me for nine months.  Nine very long months.

Progress has been slow as far as recovery.  She can walk with a cane or a walker, but she has no use of her right arm.  Speech is coming back slowly, but not enough that she can form sentences…yet.  She’s in there.  Completely in there.  She smiles and laughs when we joke.  She rejoices when her grandchildren talk to her and show her the things they’ve made her.  She can express dissatisfaction and frustration…but not very many words.  The physical disability.  That we can adapt to.  The worst part is the silence.  I can’t pick up the phone and call her just to hear her voice.  I’m so broken that I didn’t call her back right away because now, there is no voice on the other end of the line, and it might be a good long wait until there is again. 

My mother is the strength in our family.  She keeps everything and everyone together.  She is the peacemaker, the home builder, and the thread that keeps us connected.  She is the one that fought for us, taught us to fight for ourselves, and showed us what it means to have grace toward others.  Her strength is what continues to keep me strong when I’m not.  I’ve cried an ocean of tears and prayed my hardest prayers that God’s plan includes them moving to where we are.  I’ve celebrated her new milestones and fought back anger and heartbreak over what used to be.

My mom was there to hold my hand when I needed her support, and now, it’s my turn.  I’ve heard a few people lamenting at “having to” call their mothers this weekend or “having to” go to dinner at their parents’ houses this weekend.  Hold onto the times that you can do that and cherish what time you have while it’s here.  My mother was my first fan.  She was my first champion and my first supporter.  She celebrated my victories with me and comforted me through my falls.  She mended my broken heart and kissed away my boo boo’s.  She corrected my “wrongs” and bragged on my “rights”.   She was my advice giver and my complaint sounding board.  I miss her, I love her, and my heart hurts because this year, her voice will not be on the other end of the line telling me “Happy Mother’s Day.” 

If you’re not celebrating your own mother, celebrate the mothers you know this weekend especially.  Love on them just a little longer this weekend.  Don’t let yourself regret that you didn’t make that call.  I love you, Mom.

I'll love you forever,
I'll like you for always,
As long as I'm living
my Mommy you'll be.

–excerpt from Love You Forever by Robert Munsch

Tuesday, February 24, 2015

Stepping out in style...with the Downtown Tunic

I recently had the opportunity to test the new Downtown Tunic from Sew Caroline, and this top is just about perfect for what I know is warmer days ahead!  Winter cannot possibly stick around for much longer, right? 

This little number is so perfect for pairing with a pair of slacks or leggings for an evening out or with jeans for running around town!  It’s a knit woven combo and the best part? No set in sleeves!!!  I loved that it was all one piece on the top with cuffs at the sleeves.  The hi-lo skirt has two options: a solid skirt or a button front skirt.  I couldn’t resist, and I made one of each.  For the test, I let my kids pick the fabrics.  I admit I was a little terrified of what they would pick but they did alright!  Not what I would have picked for myself, but they did alright nevertheless! 

So, a little bit about the pattern!  It comes in sizes XS to XXXL, and as I said, it’s such a quick and easy sew!  It took longer for me to glue the pattern pieces together than to sew the shirt!  There is a front piece and a back piece, the cuffs, the neckband, and the skirt pieces.  Voila, that’s it!  The pattern is rated for the confident beginner, and it really is a great pattern for beginners.  Don’t let the knit part of this scare you!  There is nothing scary about this shirt at all!  There are pictures to help you out along the way, and you can email Caroline if you have any questions!  She’s super sweet and so helpful at answering questions you might have!  

As I said, the top has a hi-lo skirt on it so it’s a little longer in the back, which I love because I have—ahem—some baggage back there…and the shirt fits a little loose so I can move around in it which makes this great for chasing after my 4 and 5 year little’s.  I already have fabric picked out for at least 3 or 4 more of these tops! 


If you’re thinking you might need this pattern in your life, and I know you are, you can get it here:


AND, if you use the code DTTRELEASE15, you can get the Downtown Tunic for 15% off the purchase price.  This code is good until midnight CST 03/01/15!!

Wednesday, February 11, 2015

I love the Love Bird (dress, that is)!

I recently had the opportunity to test the new Love Bird Dress from MCM Studio Designs, and I do believe that it is definitely one of my favorites.  This dress has so many options from being tea length to just below knee length, ruffled, non ruffled, petal sleeved, cap sleeved, sleeveless, with an apron, without an apron, with a sash, without a sash...the possibilities are crazy endless!  The back has a sweet little heart shape that made me think Valentine's at first, but my daughter saw that and that was all she wrote.  She wants hearts on all of her dresses now!
Front view with sash
So, anyway, this was the first pattern that I had worked with from MCM Studio Design, and it really was such an easy pattern to work with.  Once I got in the groove, this dress came together quickly with no fuss and no muss.  I made both the longer length and the shorter length. While I love the longer length for more formal occasions, the shorter length is perfect for casual gatherings or everyday wear.
Below the knee, 3 tier length
I did make the ruffled version for both of these dresses because well, I love me some ruffles...AND this dress made me love them even more!  Yes, ladies and gentlemen, that is possible!  Linda introduced me to a ruffling method that requires NO GATHERING!  Say what?  Yeah, you heard me, no gathering.  That's a song I can definitely sing!  Her instructions walked me step by step with illustrations on each step.  They were very clear and concise, and I had no problem following the steps as I was going through the pattern.  
Ruffled shorter version
Ruffled formal version
The pattern itself ranges from sizes 2 to 14 so there's plenty of opportunity for me to get some serious mileage from this pattern.  I will say ahead of time that there are a lot of pattern piece pages, but let me tell you, it was so worth it when I got the dress done!  Both of my models are "very particular" (okay, picky) about their clothing, and both young ladies were over the moon with their new fancy dresses.  I made both a sash and an apron for the longer version so that the fabulous Miss K would have some options when it's finally warm enough for her to wear this dress.  So far, every weekend has been cruddy so she's not had the opportunity to wear it, but we're praying the groundhog was wrong and winter is going to be head out early this year.  My own mini me has already piled up the fabrics she wants for hers, and she's got a pretty good "Mommy do" list going on.  Now for more hours in the day...
Tea length with apron

Seriously, though, this dress is packed full of different options and really is so very versatile.  If you don't have this one, you NEED it!  You can pick the pattern up in Linda's Craftsy store or her Etsy store.


If you head over there between now and Monday (16 February), she has a discount code: RELEASE25 that you can use so the pattern will be $8 instead of the usual $12!

And if you get stuck for some reason, there is a Facebook group (https://www.facebook.com/MCMStudioDesigns) you can join where you can ask questions!  Linda is so sweet and is so great at walking through things with you to help you get back on track!

Happy sewing and I really hope you love this dress as much as I do!!

Blessings!
Kim